
Bokashi – The Fermentation of Organic Wastes

For quite some time I’ve been meaning to learn more about the topic of bokashi. It seemed to be an interesting waste management method that quite a few people were talking about, and given my interest in various types of composting it only made good sense for me to see what all the fuss was about.
This past winter (2008) I finally stopped procrastinating and decided to dive in head-first by starting up my own bokashi experiment. I have written about bokashi quite a bit on the blog already, but realized that it would also be very beneficial to put together a bokashi resource page. This way if someone comes to the site looking for bokashi information, they can find a good overview here and get pointed in the right direction if they choose to dig a little deeper.
Online Resources | Compost Guy Bokashi
What Is Bokashi?
Bokashi is a Japanese term meaning ‘fermented organic matter’. It is often referred to as a type of ‘composting’ but it is actually a anaerobic fermentation process, resulting in a much different end product than that produced via composting. Many people like bokashi because it is very easy, and generally (bad) odour-free. All that is needed is a bucket (with lid), some special bokashi mix, and of course some organic waste. This is a very basic overview – we’ll talk in much more detail about how to set up a bokashi bucket in the ‘Getting Started’ section.
Why Bokashi?
There are a many good reasons for getting into the habit of NOT tossing your organic waste into the trash. As discussed on the Composting Basics page, organic waste makes up a considerable proportion of the total waste stream that ends up in the landfill (typically in the vicinity of 20-40%). This is unfortunate since, apart from needlessly taking up dwindling landfill space, these materials can easily be diverted and turned into a rich organic fertilizer (among other things). Let’s now look specifically at some of the pros and cons of bokashi:
-
Advantages
- It is really easy
- It can be done on a small or large scale (so a good option for home owners)
- It generally doesn’t produce bad odours (unlike a lot of anaerobic processes)
- Produces a material that can be used as a ’slow-release’ fertilizer in your garden
- Works great as a partner strategy to composting and vermicomposting
- It can be used to deal with ALL kitchen wastes (even meat, dairy etc)
- Admit it – just saying the word “Bokashi” is fun!!
😆
-
Disadvantages
- You’ll need to make or purchase Bokashi mix
- Need at least a couple buckets (assuming no other waste management strategies used) for continual Bokashi action
- ‘Finished’ material is not really finished – still needs to be aged in soil or compost bin before beneficial for plants.
- Even though it can be done on a small-scale, the end product needs to be put somewhere (ie. potential winter limitations).
As you can see, bokashi definitely has some great advantages, but there are also some important considerations to keep in mind. I personally like the idea of using bokashi as a partner strategy to various types of composting. The simple bucket system offers a hassle free way to quickly deal with food wastes, but it also serves as a great way to start the decomposition process – essentially preparing the materials for a much more rapid breakdown and stabilization in a compost/worm bin, or directly in your garden.
Getting Started With Bokashi
As discussed above, there are really only 3 important things needed to get started with bokashi – 1) Waste materials 2) A bokashi bucket and 3) Bokashi mix

Waste Materials – As I listed in the advantages of bokashi, you can add pretty well any type of food waste to a bokashi bucket. If you an are active composter you will likely know that there are some materials not recommended for a compost pile or worm bin – namely meats, oily foods and dairy. I’m still in the testing phase of this myself – I added some steak scraps and shrimp waste to one of my buckets and will be very curious to see how quickly these materials are broken down once they are added to an aerobic composting bin.
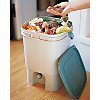
Bokashi Bucket – Experts typically recommend that you use a bucket with a spigot on it, so that you can drain the liquid that accumulates in the bottom as the waste materials decompose. Interestingly enough, some report that this liquid can be used as a plant fertilizer or even poured down your drain to eliminate odours. You can purchase complete bokashi kits (such as the one pictured to the right) if you want to do everything by the book. These commercially made buckets even have a false-bottom floor that keeps the waste materials separate from the leachate. For my preliminary bokashi experimentation I’ve simply been using regular plastic buckets with tight fitting lids. I added a layer shredded cardboard in the bottom to help prevent excess moisture from pooling. I would like to eventually purchase a bucket that has been designed specifically for bokashi, but for now my buckets seem t be working ok.

Bokashi Mix – The key component of a successful bokashi bucket is of course the bokashi mix – typically consisting of wheat bran inoculated with a special mixture of microbes, variously referred to as ‘effective microorganisms’, ‘friendly microorganisms’, or ‘efficient microorganisms’. The easiest (but most expensive) option is to purchase this mix ready-made – typically if you buy a bokashi kit it will include a bag of the microbial mix. If you are a more adventurous type you can also make it yourself. As I discovered, this is in fact much easier and enjoyable than it sounds, but there are some important things to keep in mind. Making the mixture is very easy, but it’s the drying stage that may create some inconvenience for some people.
In hindsight I’m very glad I only ended up making a small amount (enough to fill two ziploc freezer bags), because the drying material took up a lot of space and it gave off a pretty powerful odour (I won’t say it was bad, but it was certainly…obvious)
While I suppose you don’t really have to dry the mixture out, this will definitely increase the shelf-life of the material – especially important if you are making large quantities.
In order to make the mix you will need some wheat bran, molasses, and some liquid microbial inoculum. Some suggest adding various other goodies as well (such as rock dust, kelp etc), but I decided to keep it simple and just go with the basics. Below is a great video from Neal ‘The Podchef’ Foley, from the Kitchen Garden Food Company. It demonstrates how to make the bokashi mix.
(I also provide links to some other helpful resources further down the page)
Bokashi ‘How-To’ – Once you have all of the 3 key components discussed above you are ready to get started. As mentioned, filling your bokashi bucket is incredibly easy. You simply add food scraps to your bucket, along with a handful of bokashi mix over top – that’s it! Continue doing this until you’ve filled the bucket completely. You may want to use a heavy plate of some sort to help press down the materials in the bucket. This will encourage the development of anaerobic conditions. I simply pressed the food down each time then put the lid on the bucket and everything seemed to work as claimed (i.e. no bad odours etc). Once your system is completely full, simply seal it up and let it sit for a couple of weeks so that it can further decompose. Any time after that you can dig the contents directly into your garden or add them to your compost pile or bins.
Online Bokashi Resources
City Farmer EM Bokashi Composting – This is a brief but informative page about bokashi. A great recipe for making bokashi is provided – I basically followed these intructions (along with the Foley video above) when making my mix.
Great Day Bokashi – I actually bought my ‘friendly microorganisms’ inoculum from Great Day. Al Pasternak, the owner, is very knowledgeable in the field of bokashi, and more than happy to share his wisdom with others. [UPDATE: Al’s website no longer appears to be active so I have removed the link].
Bokashi – The Art and Science of Fermenting Kitchen Scraps – This is a great article about bokashi. Provides an excellent overview of the principles involves and how to get started.
Bokashicycle – This is a bokashi site that’s been around for years and includes a blog and interesting info pages relating to using bokashi for different types of wastes.
Compost Guy Bokashi Links
Some of my bokashi posts you might find interesting (in chronological order)
Making Bokashi
Vermicomposting vs Bokashi
Making Bokashi – Update
Making Bokashi – The Saga Continues
Bokashi Update – Feb 15, 2008
Bokashi Update – Feb 21, 2008
Bokashi Update – March 20, 2008
Bokashi Update – March 26, 2008
#1. December 26th, 2009, at 11:16 PM.
Hi,
I’m curious if you could make new bokashi by mixing in other mature bokashi along with whatever necessary water was required. I’m not specifically referring to wheat bran bokashi, which would require molasses be added to the wheat bran.
What I am specifically referring to is making poultry litter bokashi from previously made PL bokashi.
I look forward to your reply. Thanks in advance.
Michael