
Worm Composting Basics

Originally I wasn’t going to bother adding a worm composting page to this site – after all, I have an entire website dedicated to the topic called ‘Red Worm Composting‘. In thinking about it some more, I’ve come to realize that it would still be very valuable to have a worm composting page here at Compost Guy. This way people can come to the site and find a good overview of a number of different composting methods (and variations of composting) all in one place. Then of course, those who are really keen to learn more about worm composting specifically can check out my other site.
You might want to watch this video before reading the content below – it is basically my attempt at providing a “big picture” overview of worm composting.
What Is Worm Composting?
How Is It Different From ‘Normal’ Composting?
What Kind of Worms Can I use?
How To Start a Worm Composting System

What Is Worm Composting?
In technical terms, worm composting involves the bioxidative degradation of organic wastes via the joint action of earth worms and microorganisms. Geeky definitions aside, worm composting is simply a form of aerobic composting that involves the use of specialized worms to help break down organic waste materials. It is also known as ‘vermicomposting’, and is closely related to ‘vermiculture’ and ‘worm farming’ – although those terms general imply a great focus on the growing of the worms themselves, rather than on the waste processing and compost production side of the equation.
How Is It Different From ‘Normal’ Composting?
Aside from the obvious difference of utilizing worms while regular composting does not, worm composting is also a cooler (mesophilic) type of composting. Not only is a hot composting stage not required, but it is actually something that needs to be avoided in order to keep the worms alive (although, if the system has enough room for the worms to spread out they should be able to move away from the hot zones).
Here are some other differences:
-
Worm composting…
- Is a ‘continuous’ composting process – materials are generally added on an ongoing basis, unlike the ‘batch composting’ approach used for hot composting
- Can be done on any scale – both indoors and outdoors
- Results in an incredible compost (vermicompost / worm castings) with unique plant growth promotion properties – at little goes a long way!
- Doesn’t require any turning of material – the worms accomplish this themselves
- Can handle more moisture (again, worm movement helps to keep things aerobic)
For a full comparison of vermicomposting and hot composting, be sure to check out the blog post I wrote on the topic: Hot Composting vs Vermicomposting
What Kind of Worms Can I use?
Many people assume that you can use any type of worm for worm composting. This is in fact not the case. Effective vermicomposting requires the use of specialized earthworms – species that are adapted for life in and amongst rich organic waste materials, and warmer, crowded conditions. Just as regular soil worms won’t do all that well in a worm composting system (although they certainly can be found in the lower reaches of outdoor sytems), composting worms don’t generally do very well in normal garden soil, unless of course a considerable amount of organic waste has been added.
Species of Composting Worm
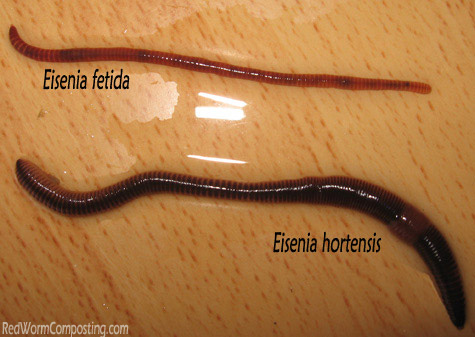
Undoubtedly the most common species of worm used for composting is Eisenia fetida – the ‘Red Wiggler’ worm, also known as Red Worms, Brandling Worms, Manure Worms, and Tiger Worms (among others). This worm can vary widely in terms of coloration and size, which helps to explain why there are so many common names. This also highlights the important of using scientific names!
This species is incredibly versatile – it has a temperature tolerance ranging from 0C (32F) to 35C (95F), is a prolific breeder, and will readily feed on a wide range of organic waste materials (more specifically, on the microorganisms inhabiting the material, but we’ll chat more about that further down).
Another species of worm used for worm composting (especially overseas), and one that is becoming much more popular here in North America, is Eisenia hortensis – the ‘European Nightcrawler’, also known as Belgian Nightcrawlers, ENCs, and Euros. This species is a larger relative of Eisenia fetida and has similar preferences and requirements.
Interestingly enough, this is a species that has been viewed by researchers as inferior to the Red Worm in a lot of ways. It reportedly has a much lower reproductive rate, is slow to mature, and is not as effective at converting wastes into vermicompost. Many worm farmers (and others who have raised them) tend to disagree however, saying they are just as good or better.
Based on my experience thus far with keeping this species I would tend to agree. I’ve found them to be a very tolerant and durable worm (more so that Reds in my opinion), active breeders, and quite effective when it comes to processing wastes. I’m hoping to test them head-to-head with Red Worms in the near future.
Aside from these two commonly used species, there are a handful of other worms used for vermicomposting as well. Generally, they are tropical worms and just don’t have the versatility (for a number of reasons) that the above-mentioned species do – especially not in cooler regions of the world. Just so you know, two commonly used tropical species are Eudrilus eugeniae (the African Nightcrawler) and Perionyx excavatus (the Malaysian Blue Worm).
Note: If you are interested in ordering worms to set up a vermicomposting system, they can now be purchased >>HERE<<
How To Start a Worm Composting System
Starting up your own worm composting system is a very simple process. There are 4 basic requirement for getting a worm system up and running: 1) A container 2) Some sort of ‘bedding’ 3) Organic waste materials, and last but certainly not least – 4) Composting worms.
I highly recommend that newcomers start by focusing on the first three well before getting worms. It is important to remember that, while you are trying to compost wastes, you are also trying to keep your worms alive and happy. A great way to do this is to create an ideal habitat for the worms to live in – something I’ll talk further down the page. In case you are interested, here are several videos I made for YouTube, showing how to build relatively simple “worm bins”. To be totally honest, I’m not all that big a fan of the stacking (with lower reservoir) bin any more – preferring more of a “K.I.S.S.” approach.
Container
The container you use for your vermicomposting certainly doesn’t need to be an expensive, ‘fancy schmancy’ system . There are a wide variety of inexpensive options out there, and who knows – maybe you won’t even need to leave the house to find something functional.

I personally prefer using Rubbermaid (TM) plastic tubs (with lids) for my indoor bins. They are very inexpensive, lightweight, and retain moisture very well. Even though I made (and now use) the bin in the video above, for the most part I like to keep things simple by using just one basic bin – although there definitely are advantages to having drainage holes and a reservoir bin below.
Regardless of what sort of system you settle on, there are a few things to keep in mind during the selection process. For starters, your bin should be opaque (i.e. NOT ‘see-through’). Worms are sensitive to light, thus a clear system may end up causing them unnecessary stress. I tried making an aquarium into a worm composting system once, and while it was pretty darn cool to be able to watch the decomposition process, I ended up feeling pretty badly for the worms. They were basically trapped in a poorly oxygenated system where they couldn’t even come to the surface or along the walls – except at night (when I would see masses of them along the glass).
Also, if you are going to use a plastic system I would suggest using something fairly soft – not the really hard plastic. The latter variety of tub seems to crack more easily, especially if located outdoors.
Bedding
Bedding is essentially the main component of the ‘habitat’ in a worm bin. The distinction between bedding and worm ‘food’ is a little misleading however, since in actuality bedding is simply a longer term food source.

Bedding materials tend to be carbon rich and absorbent, so they are important for helping to maintain some balance in the bin.
Excellent bedding materials include shredded cardboard, shredded newsprint, peat moss (although not necessarily the most environmentally friendly), coconut coir, well-aged manure, mature compost, straw, and fall leaves. I personally prefer to use the bulkier bedding materials, such shredded cardboard, since they help to encourage airflow in the bin, but combining bulky materials with some of the more absorbent materials (like coir, or aged manure) can provide you with the ultimate worm habitat.
It should also be mentioned that less absorbent materials like leaves and straw, while certainly great additions to any worm composting system, are better used as secondary bedding materials since they simply won’t hold water nearly as well as some of the other bedding substrates mentioned above.
Aside from the large quantity of bedding added when you first set up a bin, it is also not a bad idea to add a small amount each time you add food scraps as well, since this will help absorb excess moisture and ensure that the C:N doesn’t get too low (which could result in the release of ammonia gas).
Worm Food (Organic Waste)

There are a wide variety of organic wastes that can be successfully processed via vermicomposting, but some materials are definitely better suited for a worm bin than others.
Great Choices
- Fruit & Vegetable Waste
- Coffee Grounds
- Tea Bags
- Egg shells (best if crushed)
- Well-aged manure
In Moderation
- Starchy Materials – Breads, Rice, Pasta, Mashed Potatoes
- Citrus fruit and peels
- Grass Clippings and plant waste (assuming no pesticides applied)
- Hot peppers, onions
- Oily or sugary foods
Not Recommended
- Human and Pet Waste
- Meat
- Dairy
- Excessively oily foods
Keep in mind that these are simply basic guidelines, and there are many exceptions across the board. These lists apply primarily to vermicomposting newcomers who are setting up a small indoor worm bin. Using various specialized vermicomposting systems and with more vermicomposting experience, the range of “great choices” certainly expands.
It should also be said that moderation and balance are really the key to successful vermicomposting – i.e. Just because rotting lettuce is an excellent material to feed your worms, it doesn’t mean you can fill your bin completely with it and expect great results. You still need to balance the “browns” (carbon-rich) with the “greens” (nitrogen-rich) – the wet with the absorbent etc.
Preparing Your System For the Arrival of Worms
If you watched the video posted above, you should be fairly familiar with my recommendations for setting up a new bin. I thought it might not be a bad idea to included written instructions here as well.
As mentioned earlier, it is important to remember that we should be trying to create an ideal ‘habitat’ for our little wiggly friends, so that they remain as healthy (and thus as efficient) as possible. Many people recommend simply setting up a worm bin once your worms arrive – I don’t personally agree with this idea, since it basically means you are introducing your worms into a fairly sterile environment.
While we tend to think of worms as feeding directly on the waste materials that we add to the bin, more accurately, they are actually grazing on the microbial community that colonizes (and decomposes) these wastes. Of course, in the process they DO consume some decomposed waste as well, but most of their nutrition is derived from the microbes. As such, it really helps to introduce your new worms into a microbially-rich habitat. Lucky for us, creating such an environment is relatively easy.
My basic method for getting a worm bin ready involves mixing shredded cardboard (my favourite bedding material) with food waste in a volume ratio of approx. 4:3 (bedding to food) – you may want to be a little more cautious if you are just starting out, and simply add a higher proportion of bedding. This mixture is moistened (but not soaked) using a spray bottle, then closed in some sort of plastic container – it doesn’t even need to be your actual worm bin. If you are receiving your worms at the same time as your bin, simply mix up the materials in a tub or bucket then transfer to your bin once it arrives. It does help if this container has some sort of lid since this will help keep the moisture in.
I prefer to leave this mixture to sit for a good week or two (with occasional stirring and additional misting with water if necessary) since this allows for more decomposition to occur and a larger microbial community to develop, along with a better distribution of moisture in the materials.
This is also a great way to make ‘food’ for your bin once it is up and running. Simply line the bottom of a bucket with shredded cardboard and store your food scraps (mixed with more cardboard) in it for a period of time before adding them to your worm bin.
For more information about worm composting, be sure to visit my vermicomposting site: Red Worm Composting
#1. August 10th, 2008, at 11:52 AM.
hi,
Thanx a lot for the information regarding VERMICOMPOSTING…
I guess now i too can put the acquired knowledge in to practice.
Regard, NIKI