
The Sandbox Self-Fertilizing Garden

I recently wrote (on the Red Worm Composting blog) about the ‘vermicomposting trench‘ systems I’ve been using to compost restaurant food waste, and to provide my vegetable gardens with water and nutrition all summer long.
One of these trenches was added to a raised bed garden I created this year. In an unexpected turn of good fortune, my wife decided that our backyard sandbox (aka ‘neighbourhood cat litter box’) was no longer needed, and granted me permission to do whatever I wanted with it.
Of course, among the first things to pop into my mind was some sort of worm bed to help me expand my herd of Red Wigglers. Given the extreme visibility of my backyard however, I decided it might be better to use it for some sort of raised bed garden – complete, with its very own worm bed installed in the middle (a reasonable compromise, I’d say).

While some might assume that the sand would need to be completely removed in order to make a good raised bed, it’s important to remember that I’m not a ‘good’ gardener (haha). Seriously though, given the fact that the soil in my yard is a pretty heavy clay, I thought it might not be a bad idea to use the sand to my advantage – simply mixing it with some of the soil I’ve been removing from my trench systems.
One important step along the way was to remove the thick landscape cloth that had been installed along the bottom of the sandbox when it was first built (by a previous owner). It was a bit of a pain – but on the plus side it provided me with the opportunity to loosen up the compacted soil down below.

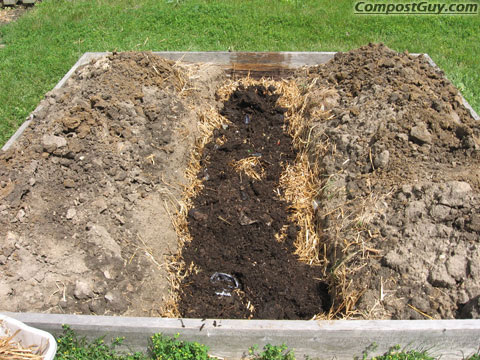
After the landscape cloth was removed, the next step was of course the digging of the trench, which involved a lot of physical labour (something I’ve grown quite accustomed to this summer)! I didn’t end up measuring the final depth of the trench, but I suspect that it was somewhere between 2 and 3 feet. Deeper trenches will obviously hold more waste materials, but the deeper you go, the slower your waste near the bottom will decompose due to the lack of oxygen.
If you are going to use composting worms in your trench (definitely recommended, but not required), you might want to monitor the temperature (with a compost thermometer) in the trench for a little while after adding all the materials when you first set it up. There is a pretty good chance it will generate a fair bit of heat initially. I’ve added worms to all my trenches, but I’ve noticed that they seem to be congregated along the edges of this one, rather than interspersed throughout the materials – likely due to the larger volume of material (per unit length) that it holds, and thus the greater amount of heat generated.

Once the trench was excavated, the first thing I did was add a lot of ‘brown’ material. I lined the bottom with a layer of straw, then added a considerable amount of corrugated and ‘egg tray’ cardboard. This will help to soak up excess moisture dripping down from the decomposing waste materials and will help to balance the C:N over time as well. Speaking of which, since I am trying to build really active worm beds, and since I don’t want there to be any smell from the rotting wastes, I’ve chosen to add more brown materials than I would if simply trying to create a hot composting heap. Over time I suspect the C:N will decrease since most of the materials I’m adding on an ongoing basis are ‘greens’, but this won’t be nearly as much of a concern once much of the bed has become more stabilized and more worm-friendly.

I next dumped in my first batch of restaurant food waste. Some of the materials I’ve been receiving in abundance include: lettuce, broccoli stems, turnip peelings, egg shells, celery waste, apple cores and peels, and cabbage waste.

Over top of the organic waste I added a nice thick layer of straw. In general, my approach with these trenches has been quite similar to “lasagna composting” (aka “lasagna gardening”), whereby alternating layers of browns and greens are added. Some suggest that this is not really an effective composting technique, but I personally think it can work very well if composting worms are being added – since they will naturally help to mix everything up (ie no turning required).
This is a shot of the bed after I added quite a bit of coarse (worm-filled) vermicompost from my large outdoor worm bin. I spread the material around as much as I did partly to help the worms get distributed throughout the bed, but also to help reduce the chance of people smelling the rotting waste below. Compost has been used as an effective biofilter (the complex structure of humus has many binding sites that can trap odour molecules), so I figured it was worth a shot!
I should mention that for the sake of saving space (downloading time etc) I’ve left out some shots of other alternating brown/green layers added during the set up. The final layer was yet another thick layer of straw (although I’ve certainly added some more upper layers since then).

Here is a shot of the garden once the trench was totally finished and plants had been added (for a more recent shot, you can simply refer back to the one at the start of the post).
I’ve heard that potatoes prefer a loose, sandy soil, and I know from experience that they are relatively easy to grow, so I thought they would be a good choice. I transferred a number of plants from another bed (where they had popped up from last year’s leftover tubers), and also put in some sprouting chunks cut from some potatoes that had been sitting in my basement for quite some time. I made sure to add some vermicompost with each plant and sprout-chunk (for lack of a better term – haha) to help stimulate root production and overall growth.
By normal standards this would have been considered a pretty late planting for potatoes I suspect (early July). I did get some wilting of the transplanted plants during the heat of the day for the first little while (totally understandable), but I was impressed with how quickly the plants took to their new bed, and the sprouts started growing into small plants.
The other plants I decided to add were pumpkins. Again, I’m pretty late with these, but I can’t wait to see how they will respond with access to the big compost trench. They are actually giant pumpkins so I am hoping to produce some big ones for the fall. Aside from being a great crop for demonstration purposes (helping me educate people about my project etc), I’m also hoping to be able to make at least one or two nice Jack o’ Lanterns by the time Halloween rolls around. Once they get going I think they will do very well. The watermelons shown in my garbage gardening article really seem to be taking off, so I’m definitely optimistic.
For those of you who don’t have access to a large organic wastestream, it might not make much sense to install as extensive trench system as I have done in my yard, but do keep in mind that there are plenty of different materials you can add, aside from food waste. Grass clippings and green yard waste (weeds etc), fall leaves, cardboard and manure are all great choices. I’ve actually been adding all my grass clippings to my trenches this year (they are normally mulched back into the lawn). Aside from providing addition nitrogen (and other nutrients) they also help to provide structure for the worms.
In my opinion, it is best to treat your trench as a ‘continuous’ composting system vs a ‘batch’ system (for a comparison of these, see: ‘Continuous vs Batch Composting‘), but completely filling your system in the spring or fall, then simply letting it sit is certainly an option as well. Just keep in mind that the level of materials in the trench will continue to sink as the wastes are broken down and the water released, so you might end up with a noticeable depression.
As you can probably tell, I’m really excited about my new sandbox garden. Rest assured, I’ll be providing plenty more updates before the end of the season!
8)
[tags]compost, composting, raised bed, raised garden, lasagna gardening, lasagna composting, worm composting, vermicomposting, vermicompost, worm compost, vegetable garden, pumpkin, potatoes, sustainable gardening, eco gardening[/tags]
Written by Compost Guy on July 25th, 2008 with
comments disabled.
Read more articles on Gardening and Worm Composting.
#1. July 25th, 2008, at 8:15 PM.
Wow! Thanks for all the great composting tips! I was wondering how you went about getting the restaurant to give you their green waste. I have a non-chain supermarket near me and am sure they have a lot of green waste.
Thanks!
-Tanner